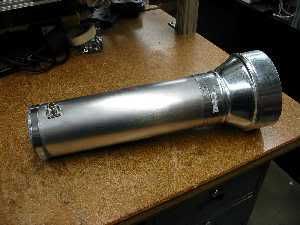
If you are interested in extending the range of your wifi network, and don't mind a little construction, here are plans for building a 2.4 gHz high gain antenna for wireless network the use of one of these antennas, I have been able to connect to my wireless access point a half a mile away!
(they were pretty ideal conditions, but more on that later..) And I probably could have gone farther, but I wasn't too keen on hiking through the woods with tall weeds, and uneven terrain balancing my laptop with one hand, and pointing one of these cantennas with the other hand. (yes, the neighbors are used to me doing strange things, and they just smile and nod.. Yes people, he really is harmless!)
Here is a photo of the finished wifi cantenna:
Typically my approach to projects is that they need to be inexpensive, but they also need to use readily available materials. this project is no different. Please excuse me while I slip into "geek mode" for a minute. This type of antenna is what is called a waveguide. There are several parameters. The two most significant ones are called the cut off frequency of the TM01 mode and the cut off frequency of the TE 11 m0de . Basically these two parameters define the highest and lowest frequency that the cantenna can operate.my problem was that I was having a hard time finding some sort of tube that was readily available. The closest thing I could find was a 4 inch aluminum dryer vent tube. This, according to waveguide calculations, was too big in diameter, and causes the upper cut off frequency to be too low. However, in messing around with many antennas through the years, I have realized that although antenna theories help us design antennas, sometimes it is an inexact science. So basically knowing that the diameter of a 4" dryer vent is too big for "optimum", I thought I should at least give it a try, and see how it works anyway. OK, I'm done with "geek mode" for now.
Here are the parts you will need for your wifi cantenna:

You will also need a piece of aluminum at least 4 inches in diameter (not shown).
Snap the dryer vent tube together, and make sure the edges are flush at the seam. Measure 13.5 inches from this end, and cut the tube to this length.

Solder aprox. 1 1/2 in. of 14 ga. wire to the N Connector. I connect a spare N male to dissipate heat from soldering.

Measure 1.75 inches from the edge of the vent.

Drill, then use a reamer to enlarge the hole so that the N connector will properly seat on the surface.

Remove all of the burrs as a result of the reamer.

Drill 4 holes for mounting the N connector. I placed the heads of the screws in from the inside with washers.

Measure a piece of scrap wire 1.25 inches, and cut it to length. This wire is a measuring guide that is to be used in the next step to cut the actual antenna element.

Using this wire as a measuring guide, cut the wire that is soldered to the N connector to the 1.25 inch length.

Attach the 4" vent clamp snugly to the end. This forms the tube into a circle. Then mark the aluminum along the outside of the clamp.


Secure the plate with duct tape. Then place the 4 inch clamp over the duct tape to secure it.

Cut 4 vertical slots in the 4 inch end of the 4" to 6" adapter. Slide the dryer vent tube INSIDE the adapter, and secure it with another 4 inch clamp.

Your wifi cantenna is now ready for use. Enjoy!

n order to test the results of my new wifi cantenna, I used netstumubler . Here is how I measured the gain. I started up my laptop aprox. 50 ft. from my access point. and let netstumbler take some readings. In the image below, these readings are labeled "Wifi Card No Ant.". Then I quickly connected my wifi cantenna, which was pointed at the access point. The resultant rise in signal is the gain of the wifi cantenna.
As best as I can tell from the graph, the readings are as follows:

Wifi Card No Ant. = -74 DBm
Wifi Card with cantenna = -57 DBm
Which gives a gain of 17 DBm. Not bad for about $10 of materials, and perhaps an hour of time!
What I would like to do now is address some common questions people usually have with reguard to my wifi cantenna.


2 Responses
how to connect to computer can you show me some photos
where do you get all these stuff to make this ? i came across some old scrap wire at my garage, but i cant find reamer,need help